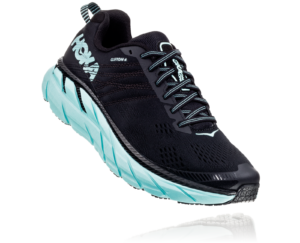
Our product of the month spotlight goes to the new Hoka One One Clifton 6.
The shoe that changed runners’ perceptions of what HOKA ONE ONE® could be, the Clifton 6 joins the award-winning Clifton family. Building upon the Clifton’s best qualities, the “6” continues to deliver that perfect combination of soft and light. The Clifton 6 has a smoother ride with a more comfortable fit and includes an embroidered design that improves lockdown without extra weight. Find your sweet spot in the Clifton 6.
Available in mid June in for men and women!
https://ddbullwinkels.com/wp-content/uploads/2019/04/1102872-NBLM_1.png12981600Matthttps://ddbullwinkels.com/wp-content/uploads/2018/06/dd-bullwinkels-moostracks-logo.pngMatt2019-05-30 09:00:372019-05-30 13:21:30POTM! Hoka One One Clifton 6
Nestled in the Pisgah National Forest, Looking Glass Rock is an iconic natural presence that beckons climbers and hikers from all over. For rock climbers, it's one of the premier multi-pitches in the South. For trail runners and hikers, it's one of the top 10 hikes around the city of Asheville (which is saying a lot considering the peaks and forests of Western Carolina are brimming with such a dazzling array of hiking adventures).
And for many, just photographing or driving past this prominent feature and witnessing it from other vantage points in the national forest area is satisfying and inspiring enough.
Everyday there are those who feel the call to summit and stand on the rounded granite face of Looking Glass Rock. And for those who do, they're rewarded with a fantastic, flat sitting picnic area and the company of commanding panoramas.
Beginning the hike to the summit of Looking Glass Rock.
Getting to the trailhead is pretty simple. Located only 5.5 miles outside of Brevard, NC on Forest Service Road 475, it's hard to miss the well-maintained and well-trodden path, not to mention the big, brown park sign showing you the way.
Not for those who are out of shape, this trail gains a total of 1,700 vertical feet in just over three miles on its way to the 4,000’ summit of Looking Glass. And a good thing to note when heading there is that this is one of the most popular hikes in Western North Carolina, so you'll want to arrive early because the parking lot can quickly fill up.
Following the yellow blazes, and getting lost in the lushness of the trail.
The trail to the top is a singletrack path etched into the mountainside that switchbacks its way up the mountain for for an out-and-back journey totaling 6.4 miles.
You'll start with a comfortable stroll through thick virgin hardwoods and verdant fern gullies, following a creek up through a hollow, until the trail begins to start switching back and forth, winding its way up the backside of the mountain towards the granite dome summit. At times, this hike can be a little challenging, but the closer you get to the top, the less steep it becomes. And trust me, the views are worth the effort and energy.
Winding up one of the many switchbacks along this hike.
Jake Wheeler
Towards the top, the hike begins to get a little rocky, foreshadowing the rock face summit to come.
Roughly two miles into the trail hikers will pass a relatively flat rock clearing with a large, painted “H.” From aerial heights, this “H” signals a landing pad for helicopter crews who come to rescue injured climbers. From the ground let this “H” stand as your reminder to watch your step during the rest of your journey! A spur trail leads from the back of the helicopter landing zone to the Lower Looking Glass Cliffs. Taking this short spur allows views of the main cliff face and a chance at solidarity from the crowds.
Otherwise, continue through a few open balds and scattered granite rock gardens that foreshadow the future sights ahead. You'll pass through wooded areas that have a few scattered campsites amongst them, and then you'll pass through a canopy of trees that create a rather welcoming tunnel for you to walk through as you make your way to the top of Looking Glass Rock.
The summit of Looking Glass is jaw-dropping. Just make sure you don't make it cell phone, lunch, or hiker friend dropping. Be careful.
Jake Wheeler
Enjoying the views from Looking Glass Rock.
The summit of Looking Glass is a somewhat of an anomaly in the Blue Ridge: it's flat-topped, thickly forested, and not particularly tall. In fact, you'll be gazing up at the mountains that engulf you, not down upon them. If you continue past the actual summit, that's where you'll reach the good stuff: the views from Upper Looking Glass Cliffs are simply good for the soul.
We recommended packing a small daypack with water, some granola bars, a camera, lunch for the summit, and a light pullover if it's windy on top. If you're thinking about hiking to the top of Looking Glass Rock, share your adventures with us by tagging #RootsRated. And remember to always Leave No Trace.
Written by Jake Wheeler for RootsRated and legally licensed through the Matcha publisher network. Please direct all licensing questions to legal@getmatcha.com.
https://ddbullwinkels.com/wp-content/uploads/2019/05/unvi2tkhdl3evupwprpr.jpg6911044Matthttps://ddbullwinkels.com/wp-content/uploads/2018/06/dd-bullwinkels-moostracks-logo.pngMatt2019-05-23 13:51:192019-05-23 13:51:19Hiking to the Top of Looking Glass Rock
Take care of your boots and they’ll take care of you.
We expect a lot from a pair of walking boots, demanding they keep us upright on all kinds of treacherous terrain, as well as ensuring our feet are dry and warm no matter what weather we wear them in. And then what thanks do our trusty boots get? They get shoved in a plastic bag at the back of a cupboard because we can’t be bothered to clean or dry them after a long day on the trails.
If that sounds familiar then it’s time we staged an intervention – your boots deserve better. For advice on how to look after your walking boots, SportsShoes.com hooked us up with Salomon ambassador Squash Falconer, for these top tips.
How To Clean Walking Boots
“It is really important to clean boots each time you get them dirty,” says Falconer. “If you’re really tired, the day after your hike is OK, but don’t leave them any longer.
“When cleaning your boots, it’s good to have a small brush – an old toothbrush or washing-up brush works well. It’s best to use a specific shoe cleaner and avoid using bar soap or stronger detergents because they may contain additives that can damage the leather and affect how waterproof the material is. If you are cleaning mould off your boots or they smell, use a mixture of water and vinegar and rinse thoroughly with clean water afterwards.”
Here’s Falconer’s six-step process for cleaning walking boots.
Remove the laces and insoles. Bang the boots together or against a hard surface to remove excess dirt, mud and stones lodged in treads and caked around the boot. If the boots are dry, use a hoover on the inside and out to remove the finer dirt or sand particles. Clean them with a damp cloth or under running water (depending on how dirty they are) and use the brush with your boot cleaner to scrub away all remaining dirt. Rinse with clean water. Use the same process for the boot insoles.
If you’re thinking that sounds like a lot of work and are starting to wonder if you can just shove the boots in your washing machine, don’t!
“Never put your boots in a washing machine – that accelerates the ageing process and can cause a lot of damage,” says Falconer.
How To Dry Walking Boots
“If boots are left damp, mould will quickly set in, the material will start to break down and the smell can be dreadful,” says Falconer, who offers another six-step plan for drying boots.
Remove the laces and insoles. Dry the insoles separately and only put them back in when boot and insole are both completely dry. Stuff each boot with newspaper. Do not place boots in direct heat, including fireplaces. This can damage the leather or material and weaken adhesives. Low humidity is key. Speed up the drying process using a fan or boot dryer. Store the boots in a well-ventilated area. Avoid damp or hot places.
If you have leather boots it’s worth applying a special conditioner after they’re clean and dry.
“Leather boots will last longer and age better if you treat and condition them,” says Falconer. “Once they’re clean and dry, simply use a cloth to apply the conditioner to the leather, removing any excess, and buff to polish.”
Written by Nick Harris-Fry for Coach and legally licensed through the Matcha publisher network. Please direct all licensing questions to legal@getmatcha.com.
Featured image provided by Coach
https://ddbullwinkels.com/wp-content/uploads/2019/05/khtikteylndghudh7nov.jpg5881044Matthttps://ddbullwinkels.com/wp-content/uploads/2018/06/dd-bullwinkels-moostracks-logo.pngMatt2019-05-07 19:24:012019-05-07 15:24:04How To Clean Walking Boots